
Hey, Phoebe here! If you’re new to my website, welcome. If you’re not new, welcome back. 😊
A little bit about me: I recently graduated from PA school and will be starting my first PA position at NewYork-Presbyterian/Weill Cornell Medical Center. During PA school, I graduated summa cum laude and was the recipient of several scholarships and awards, including the American Academy of PAs (AAPA) 2025 PA Student of the Year Award .
.
Note: If you’re just dying to know more, feel free to check out my biography
You probably found this article because you’re trying to figure out the best way to study for PA school. If you’re staring at a mountain of lecture slides, textbook pages, and YouTube videos and wondering what actually matters, don’t worry—you’ve come to the right place.
During PA school, I created targeted study guides as a way to organize the chaos for myself. It was something I started doing in high school and continued to refine throughout college. Pretty soon, all of my classmates, as well as friends from other PA programs, were using my study guides to study for exams. Everyone who used them found them extremely tailored and helpful. Now, I’m excited to share them with you!
Table of Contents
Why HowMedWorks Study Guides Work So Well
This article explains how my guides are structured, why they’re designed this way, and how to use them to your advantage. They’re optimized to take advantage of visual memory and pattern recognition so information sticks with far less effort. Once you understand the method behind the madness, studying becomes faster, more intuitive, and far less stressful.
Think of these guides as graphically-organized, high-yield cheat sheets that will allow you to maximize both your GPA and personal life. (I did the heavy-lifting so you don’t have to.) Let’s get into it!
If you’re currently in didactic year, I encourage you to check out my clinical medicine study guide collection
If you’re a clinical-year student, I have EOR exam study guides
A Constantly Updated Resource
Firstly, these guides weren’t created once and left untouched. They’ve been:
- Constantly updated with new information that shows up during didactic and clinical year
- Informed by a wide variety of well-established study resources
- Adjusted for very specific details and trick questions that appear over and over again
- Repeatedly refined for clarity and page layout in order to maximize recall
Whenever I came across new or updated material—whether through lectures, rotations, practice questions, or exams—and noticed it wasn’t already included in my study guides, I would add it in or fine-tune the existing content. Therefore, what you’re getting is an accurate, up-to-date culmination of everything PA school throws at you, distilled into one place.
Why Are HowMedWorks Study Guides the Best?
The Ultimate, Comprehensive PA School Study Guides
Each HowMedWorks study guide condenses thousands of lecture slides, textbook pages, and hours of video content into a streamlined, high-yield resource. To create these study guides, I synthesized key material that I encountered all throughout PA school. Some of the study resources I used were:
- Lecture slides
- Classroom learning
- Required textbooks
- Clinical guidelines
- Clinical rotations
- PA Education Association (PAEA) EOR blueprints & topic lists
- PAEA End of Rotation (EOR) exams
- PAEA PA Clinical Knowledge Rating and Assessment Tool (PACKRAT) exams
- PAEA End of Curriculum (EOC) exam
- Blueprint (formerly Rosh Review) Qbank
- Hippo Education EOR practice exams
- PANCE Prep Pearls
- Smarty PANCE
- Cram the PANCE
- Kaplan Qbank
Rather than dumping information into vague boxes across hundreds of pages, every detail is intentionally and strategically positioned and formatted to maximize understanding, memorization, and rapid recall. The structure, visual hierarchy, and organization are all designed to work with how your brain naturally processes and stores information, helping you see connections, retain key concepts, and recall details efficiently.
Basically, everything you need is compiled in one place. Instead of jumping between textbooks, slides, and videos, these comprehensive guides consolidate all the high-yield information into a single, streamlined source, saving you time and helping you study much more efficiently.
Maximum Amount of Information, Minimum Number of Pages
Something I do want to mention is that every guide is well under 100 pages. A lot of study guides out there run 200, 300, even 400+ pages, which sounds comprehensive but can actually work against you. When you’re dealing with that much material, it becomes really difficult to review everything multiple times before your exam, and repetition is key.
Additionally, many of those longer resources rely on uniform table-based layouts, where large amounts of information are included in identical-looking boxes on every page. When a study guide is hundreds of pages long, and everything looks the same, it becomes much harder for your brain to form visual landmarks or “mental snapshots,” which makes you lose your visual memory advantage and ultimately limits recall when it’s test-taking time.
With a concise guide, you can realistically read through the entire thing three, four, even five times in the same amount of time it would take to get through one of those massive guides once. This repeated exposure is what actually makes information stick.
Plus, when everything is streamlined and focused on what you actually need to know, you’re not wasting mental energy sorting through filler and poor formatting (which kind of defeats the purpose of using a study guide in the first place). No more dealing with obvious, unhelpful details (e.g. listing fatigue and malaise for nearly every condition) that not only don’t add any real study value but also increase page counts by tens or even hundreds of pages.
Study Guides Designed to Work with How Your Brain Actually Learns
In this section, you’ll see how everything is organized in a way that works with how your brain naturally processes and retains information, not against it. Instead of fighting your brain’s tendencies, these guides leverage them. My goal was simple: to remove every studying obstacle I could so that you can focus your energy on actually learning instead of fighting through poorly organized content.
Note: Keep in mind that I originally made these study guides for my own learning so I created something that I would actually want to look at.
Topics Are Grouped Intentionally
Depending on the type of study guide (i.e. clinical medicine, EOR), conditions are organized either by anatomy or specialty. For instance, my Orthopedics Study Guide (clinical medicine) starts with the shoulder and ends with the foot (i.e. superior to inferior). On the other hand, my EOR exam study guides are usually grouped by specialty because they have to cover a wider range of topics (as opposed to clinical medicine units that focus on a single medical specialty).
Within these sections, topics are then organized by subject, similarity, and common points of confusion (i.e. related conditions are placed right next to each other). This is especially important because exams often use similar-sounding answer choices to really test your knowledge. For instance, you might see rubeola versus mumps versus rubella, or you might get a question with a bunch of different heart murmurs presented all together.
 comparing medial and lateral epicondylitis. By having the two related but distinct conditions side by side allows for easy comparison. This way, you can immediately identify what sets them apart and will be able to quickly pick out the correct answer on an exam.
Moreover, you’ll often notice that conditions are organized from least to most serious throughout sections and the entire guide—progressing through low-acuity, chronic, severe, and emergency. For example, in my Pulmonology Study Guide, you’ll see conditions in the following order: acute bronchitis → restrictive lung disease → lung cancer → acute respiratory distress syndrome (ARDS). This structure makes it easy to find any topic quickly.
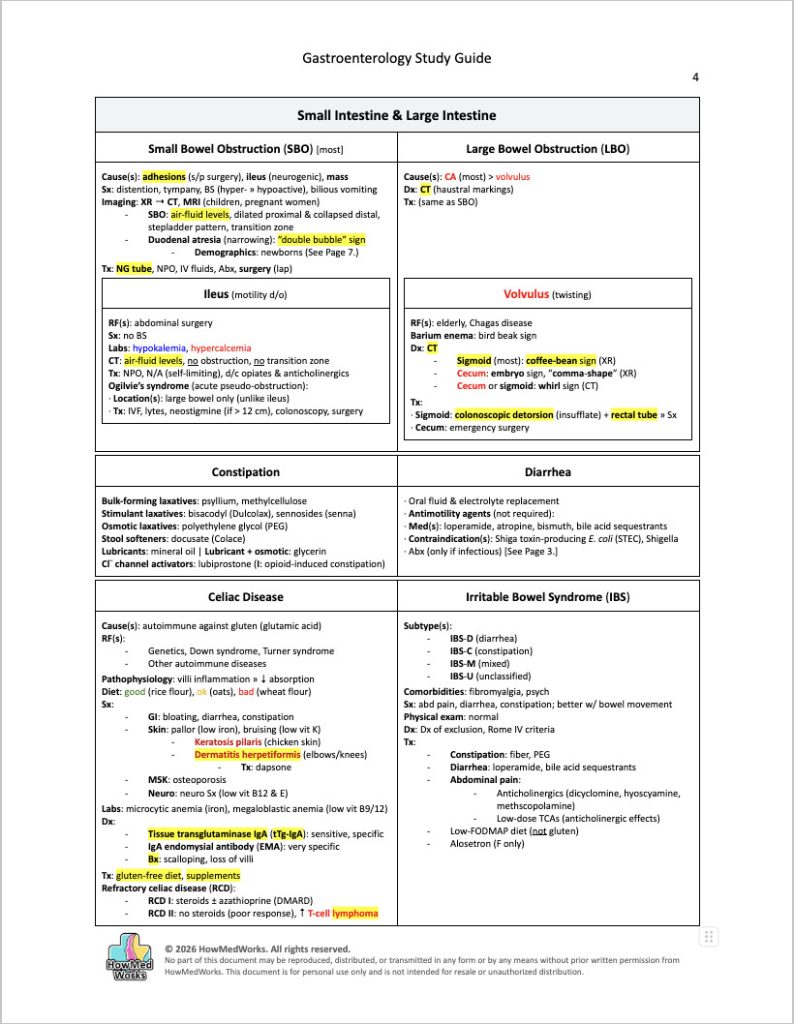
Boxes Are Used on Purpose
As you’ll quickly see, everything lives inside a box, and that’s very intentional. I’ve noticed that people who tend to go into medicine have some level of photographic memory.
Think about it: we’ve all had that moment on a test when we can picture exactly where something was on the page and what color it was highlighted but can’t quite recall the exact words. (You know exactly what I’m talking about.)
I’ve found that using boxes—with one condition per box—helps leverage that visual memory, making it much easier to remember key details and compare similar conditions side by side. Ultimately, they make it easier to mentally “pull up” a section of the guide under pressure.
Now that we’ve gone over how the boxes are organized, let’s talk about what is inside those boxes. Again, each condition (e.g. medial epicondylitis, lateral epicondylitis) gets its own box, and box content typically follows this format:
- Causes
- Pathophysiology
- Demographics
- Risk factors
- Symptoms (Sx)
- Diagnosis (Dx)
- Treatment (Tx)
- Prognosis
For each of these categories, the most common or classic example is usually listed first and often highlighted, bolded, or color-coded to help it stand out. This makes it easier to recognize high-yield information quickly and prioritize what you’re most likely to encounter on exams. Take a look:

Something else I try to do is to keep conditions that overlap across study guides structured similarly so there’s consistency. For instance, a lot of the topics that appear in gastroenterology (didactic year) show up again in surgery (clinical year). By keeping the overlapping material and formatting consistent in both study guides, you can quickly recognize sections you already know, recall information more easily, and decide whether you want to skip over that material.
Color-Coding & Highlighting: Turning Visual Memory into a Superpower
Now, let’s talk about color-coding. Colors aren’t just nice to look at; they’re memory triggers. Many studies have shown that people naturally associate certain colors with different types of information, making color a powerful tool for recall.
Fun fact: People tend to associate the color green with safety and calmness and red with danger or urgency. This is why stop lights are red and go lights are green!
1. Green, Yellow & Red—Severity Level
Similar to the psychology behind traffic light colors, I’ve applied the same color code throughout my study guides to convey severity:
- Green: mild; low-risk; benign; non-emergent
- Yellow: moderate; intermediate-risk
- Red: severe; high-risk; malignant; emergent; life-threatening; pain; red flags; absolute contraindications; black box warnings
 , you can see this green, yellow, and red color code being used. Here, all of the breast cancers are in red to denote malignancy. Lobular cancer in situ (LCIS) is the only one in the color orange because, even though it’s technically benign, it increases the risk of developing breast malignancy (i.e. it sits somewhere in the middle on the severity scale). Moreover, green and red are used to denote good and poor prognosis, respectively. Finally, this color code is also used for the mammogram findings.
Note: This is not to say that you have to memorize the color of everything that’s color-coded. However, it’s very helpful when you keep seeing a condition written in the same color because you’ll eventually associate the condition with that color and instantly know additional information about the condition without explicitly having to memorize more about it.
2. Blue & Red—Functional Effects
In addition to the green, yellow, and red color-coding, I frequently use the colors blue and red in opposition to indicate functional polarity:
| Blue | Red |
| Low (e.g. hypocalcemia, hypoactivity) | High (e.g. hypercalcemia; hyperactivity) |
| Viral (e.g. lymphocytes) | Bacterial (e.g. neutrophils) |
| Nerve (e.g. foot drop) | Muscle (e.g. rhabdomyolysis) |
| Inhibitory (e.g. depressants, botulism) | Excitatory (e.g. stimulants, tetanus) |

3. Blue & Pink—Demographics
Blue and pink are also used throughout the guides to indicate biological sex. (Call it old-school, but it works.) Blue indicates male-predominant conditions, such as pediatric GI issues, while pink is used for female-predominant conditions, like anxiety disorders.
Note: Pregnancy-related topics are also shown in pink.
On exams, you may not remember every statistic, but you will remember that an entire section was mostly one color, and your brain will instinctively recall the demographic association.
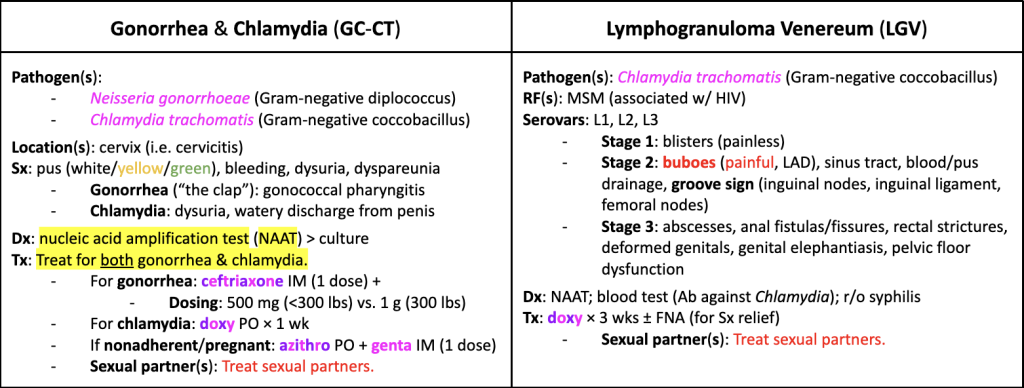
4. Purple & Pink—Bacteria, Gram Staining & Antibiotics
You may recall a little something about Gram stains from college microbiology. To quickly refresh: Gram-positive bacteria stain purple, while Gram-negatives stain pink. Accordingly, purple is used for Gram-positive bacteria, while pink is used for Gram-negative bacteria.
Similarly, antibiotics are color-coded based on their coverage (i.e. Those that target only Gram-positive bacteria are purple, those that target only Gram-negative bacteria are pink, and antibiotics that cover both are shown in a mix of the two colors.). Here’s an example:
5. Orange & Blue—Acid–Base
This color code mirrors the pH indicators you probably used at some point in undergrad chemistry:
- Orange: acidic; hyponatremia; hyperkalemia
- Blue: alkaline/basic; hypernatremia; hypokalemia
As you can see above, I’ve also included some electrolyte disturbances. Though not absolute by any means, hyponatremic and hyperkalemic states tend to be associated more often with metabolic acidosis, which is why they’re orange. On the flip side, hypernatremic and hypokalemic states are usually associated with metabolic alkalosis, which is why they’re blue.
Fun fact: “Basic” and “alkaline” mean pretty much the same thing (i.e. pH greater than 7), but “alkaline” is used for solutions, while “basic” refers to the chemical property itself.
In biology and medicine, you’ll probably hear “alkaline” used more often than “basic” because we’re usually talking about bodily fluids or solutions.
6. Yellow Highlights—Must-Know Information
Yellow highlights are used to mark must-know facts, key differentiators, and information that keeps appearing on exams (even if it seems lower-yield). If something is highlighted in yellow, assume it has been tested repeatedly. No matter how niche or specific, it’s something you need to know.
Below is an example from my Neurology Study Guide. (I can’t even tell you how many absence [petit mal] seizure questions I’ve come across asking about the highlighted information.)

7. Other Colors—Real-Life Color Associations
Some things are just colored the way they appear in real life. For instance:
- Purpura → dark red/purple
- Blueberry muffin rash → blue
- Bile (gallbladder) → green
This taps into visual realism, which strengthens recall.
Other Study Features
- Relevant diagrams and images to reinforce written material
- Extra margin space so you have space for your own notes
- Concise length that makes repeated review realistic and efficient
- A layered learning design so you focus on essentials first and details after
Need more study tips? Check out this video (33:04) where I break down exactly how I studied in PA school. It’s a perfect next step if you want to dive even deeper:
Current Available HowMedWorks Study Guides
Here are all of my currently available PA school study guides:
Clinical medicine (didactic year) study guides:
EOR exam (clinical year) study guides:
| Family Medicine Guide | Surgery Guide |
| Emergency Medicine Guide | Women’s Health Guide |
| Internal Medicine Guide | Pediatrics Guide |
| Psychiatry Guide | |

Final Thoughts
Overall, these guides were my primary study resource during PA school. Collectively, they represent hundreds of hours of careful refinement and intentional design. They were what I relied on when I was a student, and I still continue to reference them to this day when I need to look something up.
With them, you’ll be able to study smarter (not longer), reduce stress, and walk into exams feeling confident. These guides are designed to take the overwhelm out of PA school by organizing high-yield information in a way that actually sticks so you can get the most out of every minute you spend studying.
Side note: Having these guides at hand also gives me peace of mind for recertification, since I won’t have to start from scratch or scramble to find reliable resources later on.
Knowing that these study guides have supported so many other PA students makes all the effort worthwhile—I hope you find them incredibly helpful as well. If you’re looking for more study tips, be sure to check out my “8 Tips for Succeeding in PA School: How I Got Straight A’s (and You Can Too!)” article.
Good luck and, as always, stay healthy and keep learning. You’ve got this! 💪